Growing Ginger at Home: A Step-by-Step Guide to Propagating Your Own Ginger Plants

Ginger, with its unique flavor and medicinal properties, is a versatile ingredient used in culinary and natural medicine practices worldwide. While it’s readily available in grocery stores, growing your own ginger at home can be a rewarding experience. In this article, we’ll explore the step-by-step process of multiplying ginger from a small piece, both in water and in the ground, allowing you to enjoy a constant supply of fresh ginger right from your garden.
- Selecting the Ginger Rhizome:
- Before you start growing ginger, you’ll need to choose a suitable ginger rhizome, also known as the ginger root. Look for fresh, plump ginger rhizomes with well-developed buds or “eyes.” These are the points from which new shoots will emerge. Organic ginger is preferred, as it’s less likely to have been treated with growth inhibitors.
- Preparing the Ginger Rhizome:
- Once you’ve selected your ginger rhizome, prepare it for planting by soaking it in water overnight. This helps to hydrate the rhizome and encourage sprouting. After soaking, cut the ginger rhizome into smaller pieces, ensuring each piece has at least one or two well-developed buds.
- Growing Ginger in Water:
- Growing ginger in water is a simple and effective way to propagate new plants. Here’s how to do it:
- Fill a shallow tray or container with water.
- Place the ginger pieces in the water, ensuring the buds are facing upward.
- Keep the tray in a warm, bright location, away from direct sunlight.
- Change the water every few days to prevent stagnation and mold growth.
- After a few weeks, you should start to see new shoots emerging from the buds.

- Transplanting Ginger into the Ground:
- Once the ginger shoots have developed roots and are approximately 3 to 4 inches tall, they’re ready to be transplanted into the ground. Follow these steps:
- Choose a suitable location in your garden with well-draining soil and partial sunlight.
- Prepare the soil by adding compost or organic matter to improve fertility and drainage.
- Dig holes in the soil, spacing them approximately 8 to 10 inches apart.
- Gently remove the ginger shoots from the water, being careful not to damage the delicate roots.
- Plant each ginger shoot in a hole, covering the roots with soil and ensuring the buds are just below the surface.
- Water the newly planted ginger shoots thoroughly and continue to water them regularly to keep the soil moist but not waterlogged.
- Caring for Ginger Plants:
- Once your ginger plants are established in the ground, they require minimal maintenance. Here are some tips for caring for your ginger plants:
- Water: Ginger plants prefer consistently moist soil, so water them regularly, especially during dry periods.
- Fertilizer: Apply a balanced fertilizer or organic compost to the soil periodically to provide nutrients for healthy growth.
- Mulching: Mulch around the base of the ginger plants to conserve moisture, suppress weeds, and regulate soil temperature.
- Pruning: Remove any yellowing or dead leaves from the ginger plants to encourage new growth.
- Harvesting: Ginger can be harvested when the plant is about 8 to 10 months old. Carefully dig around the base of the plant to harvest the rhizomes, taking care not to damage the roots.
Trick to make ginger bloom
Ginger can flourish if its tropical growing conditions are respected. Here are some tips to encourage flowering:
Heat and humidity conditions: Make sure ginger is grown in a warm and humid environment. Maintain a constant temperature above 20°C and high humidity.
Light: Expose the plant to indirect and diffused light. Flowering can be stimulated by constant indirect light.
Special care: Apply a phosphorus-rich fertilizer to encourage flower formation. A well-made compost or flower-specific fertilizer can help.
Timing: Ginger flowering can take patience, sometimes only appearing after 1-2 years of continuous growth

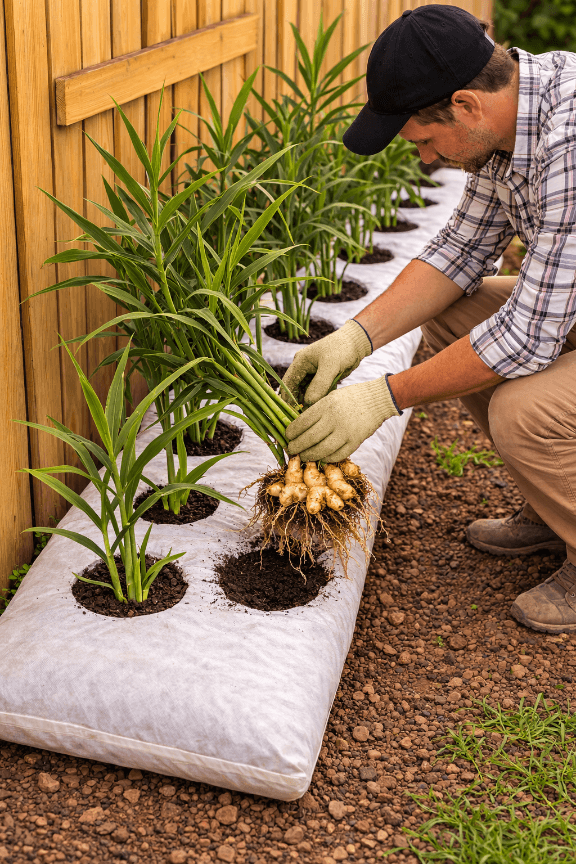
Growing Ginger in Sacks – Easy Method
Growing ginger in sacks is a simple and space-saving way to grow fresh ginger at home. Ginger grows very well in containers or grow bags because the soil stays warm and loose, which helps the roots develop easily.
What you need:
Fresh ginger rhizomes with small buds, a large sack or grow bag, rich garden soil or compost, and water.
How to plant:
Cut the ginger into small pieces, making sure each piece has at least one bud. Fill the sack with loose, nutrient-rich soil and plant the ginger pieces about 5–8 cm (2–3 inches) deep with the buds facing upward. Space them a little apart so they have room to grow.

 How to Multiply Ginger — Pre-Sprouting Method
After cutting the ginger into pieces (making sure each piece has at least one bud or “eye”), you can place them in a shallow tray with slightly moist soil or keep them in a warm spot until small shoots appear. Each new sprout can develop into its own plant.
Once the sprouts become visible, you can:
- Separate the pieces — each sprouted piece becomes a new plant
- Plant each piece individually in a pot, grow bag, box, or directly in the ground
- Grow multiple ginger plants from a single root
 Why This Method Works Well
- Increases your success rate, as you can see which pieces sprout before planting
- Allows you to choose the strongest shoots
- Lets you grow much more ginger from one single rhizome, instead of just one plant
This method is simple, reliable, and perfect if you want a larger harvest from a small amount of ginger.
Care:
Keep the soil slightly moist but not too wet and place the sack in a warm spot with partial sunlight. After a few weeks, green shoots will start to appear. As the plants grow, they will develop new ginger rhizomes under the soil.
Harvest:
After several months, when the plants are mature, you can gently pull out the ginger from the sack and enjoy your fresh home-grown harvest.
Conclusion:
Growing ginger at home from a small piece is a rewarding and straightforward process that allows you to enjoy a constant supply of fresh ginger right from your garden. Whether you choose to propagate ginger in water or directly in the ground, following these steps will help you successfully multiply your own ginger plants at home. With proper care and maintenance, you can harvest your homegrown ginger rhizomes and enjoy their culinary and medicinal benefits for years to come.